
Install Exchange 2016 with Active Directory Sites
Installing Exchange 2016 is one thing. Doing this in an environment with multiple sites demands special steps.
If you have just deployed your server, you might not have thought about the fact that your schema master is not in the same site as your new server.
This matters for Exchange 2016. If you run /prepareSchema or /PrepareAD, you might encounter a lot of AD-errors such as:
- The Active Directory schema isn’t up-to-date, and this user account isn’t a member of the ‘Schema Admins’ and/or ‘Enterprise Admins’ groups
- The forest functional level of the current Active Directory forest is not Windows Server 2003 native or later. To install Exchange Server 2016, the forest functional level must be at least Windows Server 2003 native
- Either Active Directory doesn’t exist, or it can’t be contacted.
- Setup can`t use the domain controller ‘DC’ because it belongs to Active Directory site ‘Site1’. Setup must use a domain controller in the same site as this computer
Even if all the above are correctly configured (e.g. your are a member of the AD groups), the errors still return.
Let me show you how we solve this issue.
Locate the schema master
the schema master is the domain controller that is responsible and authorized to make changes in the AD Schema.
there can only be One schema master. Before installing Exchange, it is important to know which DC is the schema master.
To check this, you can execute the command “netdom query fsmo”
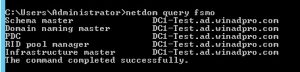
FSMO Roles
Next, it is important to identify the different sites you have in your organization.
do this by going to the Active Directory Sites and Services tool on any DC
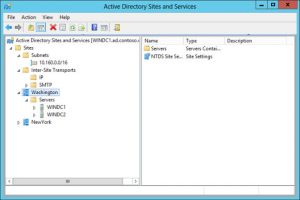
AD Sites and Services
By looking into the folder “Servers” you can see which DC is located in which Site.
By executing the command “echo %logonserver%”, you can see what DC your server uses to logon. Compare this with the servers in your sites.
Now you have an idea if you’re dealing with a server inside or outside the schema masters’ site. Most likely, if you received the errors above, your server will be outside the schema masters’ site.
AD Preparation
Since your new server is located outside the main site, you will not be able to prepare the Active directory unless you move the Schema master to the site your server is located in. However, this is not needed.
Look for a server that is located in the main site of your domain. Connect to that server and mount your Exchange ISO. Do not run the setup!
Open PowerShell as an administrator instead and change directory (cd) to your ISO (mostly E or F): cd E:\
When you are in the ISO, run .\setup.exe /prepareSchema /IAcceptExchangeServerLicenseTerms
Executing this command will not install Exchange on this server. It will only prepare your active directory for the existence of an Exchange server. Nothing more!

Prepare AD Schema
Next, execute the command .\setup.exe /prepareAD /IAcceptExchangeServerLicenseTerms /OrganizationName
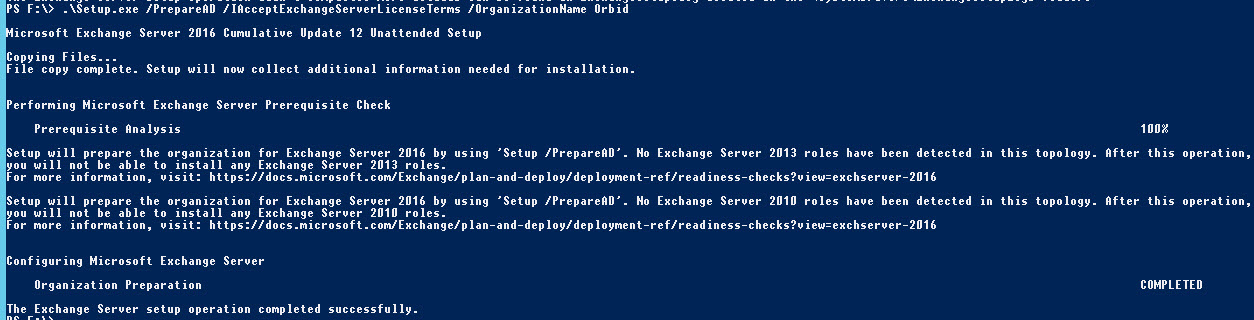
Prepare AD
In a normal setup, you would be ready to run the setup. what you’ve done now, is only prepare the site where your Schema master is located in. If you run the setup now on your new server outside the site, you will receive the same errors together with a AD replication error:
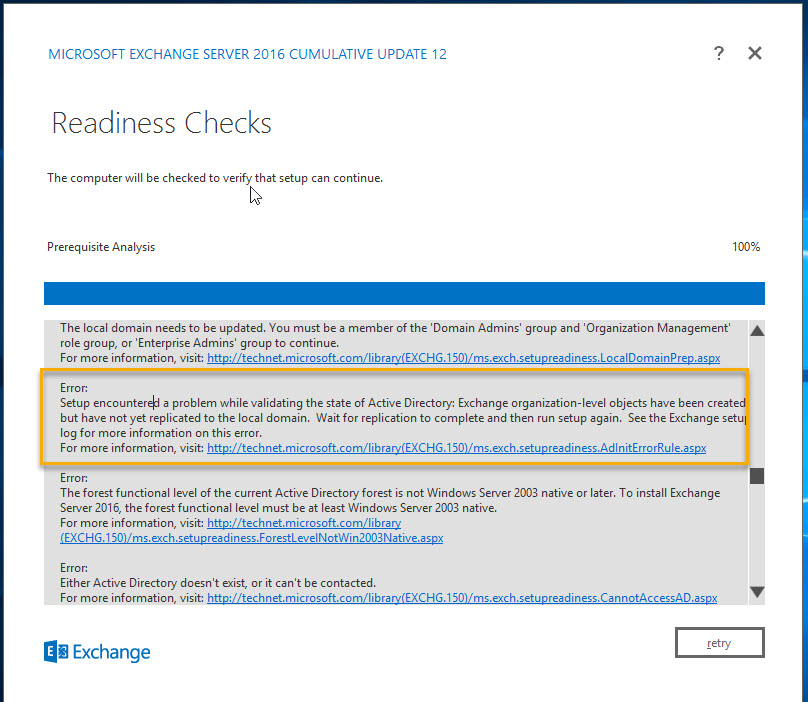
Exchange installation error
You will have to execute an extra command: .\setup.exe /PrepareAllDomains /IAcceptExchangeServerLicenseTerms

Prepare All Domains
After this, restart your new server and start the setup. Your AD errors will now all be gone and you will be able to continue with your installation.


I’m a 27 year-old Belgian working for Orbid NV as Senior System Engineer. I’m a member of the cloud Team where I focus on everything from Teams PSTN and Exchange to AVD & Intune.
Hi Andreas Van Waeyenberge,
I am in the process of migrating from Exchange 2010 SP3 to Exchange 2016
I have a company with 2 Datacenters, each one has an AD Site. Exchange 2010 SP3 RU30 is installed on Site A. I want to upgrade to Exchange 2016, but installing it from Site B, which is not the one with the MX records (non-facing internet, but has independent internet output) but the idea is to use this to migrate from Site A and once the mailboxes have been migrated to Site B, the DNS records are modified and Exchange 2010 can be deactivated from Site A. This can be done?
Can I install Exchange 2016 on Site B directly (Pre-extending Schema / Domains / AD on FSMO server via \\ ExchServerShareEnSiteAD2 \ setup.exe from Site A?).
PS: Exchange 2010 has 2 EDGE subscriptions. At the time of installing Exchange 2016 on site B (If you confirm it, can I) do I have to subscribe it with the 2010 EDGE? Or in the transition, can I only use Exchange 2010 as a proxy, without subscribing Exchange 2016 to the EDGE servers?
The EDGEs will be removed once Exchange 2010 has been uninstalled from Site A, by an antispam in the cloud (trendmicro or another).
I hope you can answer these 2 minimal questions …
Thank you!
Hi Gustavo
Apologies for the delayed reply.
If you are upgrading from 2010 to 2016, there is always 1 main thing you should keep in mind concerning mail transport and client access; Proxy functionality is only down-level.
This means that clients accessing Exchange 2016 can be proxied to Exchange 2010, but clients accessing Exchange 2010 cannot be proxied to Exchange 2016.
So in your case, you will not have any issue until you will start moving users to 2016, since your records point to 2010 and Proxy functionality is only down-level.
Concerning the Edge servers, You can install exchange 2016 within Edge transport role in your current environment, and then create edge subscriptions between Exchange 2010 Hub Transport servers and an Exchange 2016 Edge Transport server.
If you aren’t planning on installing new 2016 Edge Transport servers, I’d configure your antispam solution first to replace the edge servers and then migrate to Exchange 2016.