
Creation of Azure AD users with Graph API (triggered by a Power Automate or Logic Apps flow)
In this blog, I will explain how to create Azure AD users with Graph API, triggered by a Power Automate flow (you can also use Logic Apps). Next step is to assign licenses to the created user with a PowerShell script in Azure Automation and send notifications when there are not enough available licenses anymore in the tenant.
PART 2: Assign licenses to the user with PowerShell and Azure Automation
PART 3: Overview of the Power Automate Flow
Creation of the User
You can create a SharePoint list or a Microsoft Form to enter the required information about the user, e.g. first name, last name, job title, department,… Once the information is submitted, a Power Automate will be triggered to start the user creation process.
Graph API
To create the user with application permissions in Graph API, we need to create an app registration in Azure AD. You can follow this documentation to register an app.
The required permissions to create an Azure AD user, are found in the documentation of the api:
https://docs.microsoft.com/en-us/graph/api/user-post-users?view=graph-rest-1.0&tabs=http#permissions
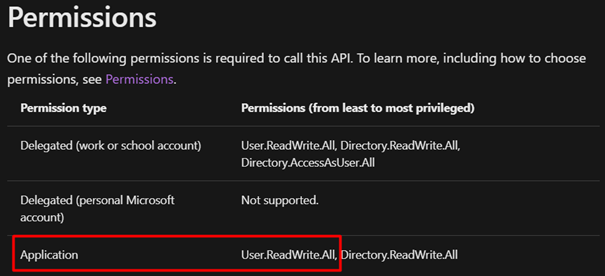
We need the permission “User.ReadWrite.All” to be added to the registered app. In the registered app, navigate to App Permissions and click on “Add a permission”:

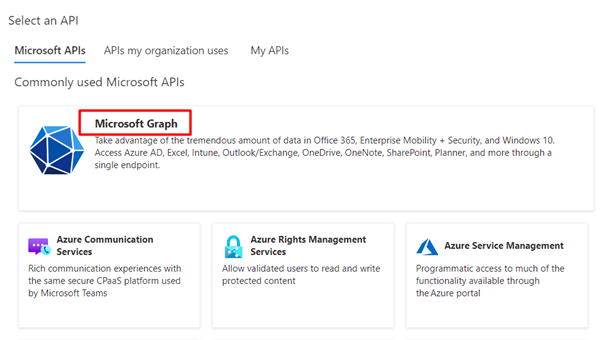
Click on Microsoft Graph:
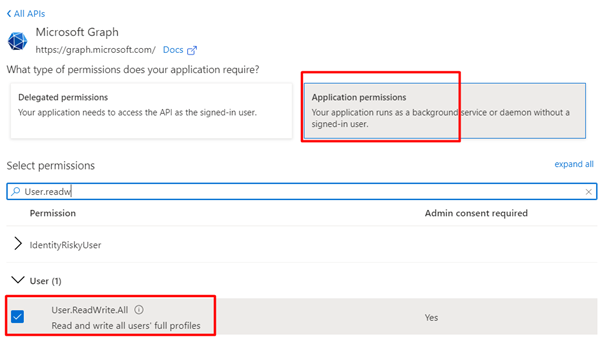
Search for User.ReadWrite.All in the application permissions and click on “Add permissions” at the bottom:
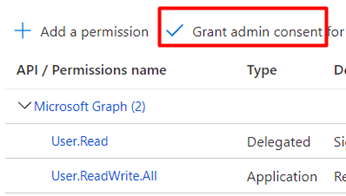
This permission needs consent of a global admin before we can use it for the user creation process. Click on “Grant admin consent” as a global admin.
Now we need a client secret to authenticate against the registered app. You can create this in the Certificates & secrets section of your app:
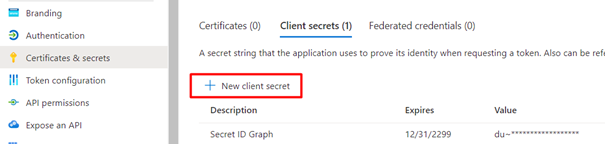
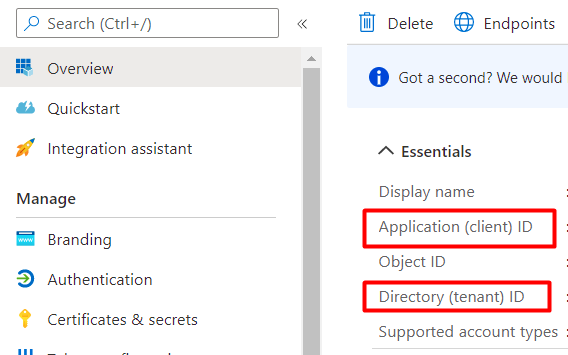
Copy the client secret somewhere because you can only see it once. We need this client secret later. Other things that we need are the Application ID and Tenant ID. You can find it in the Overview. Copy them also:
Power Automate flow
Create a new flow and select the trigger you want to use for the process (for example SharePoint of MS Forms).
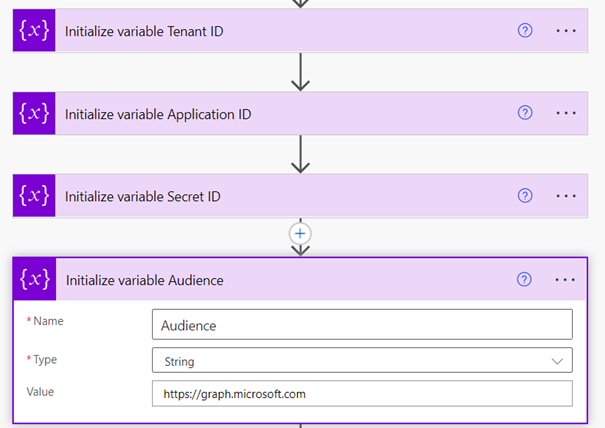
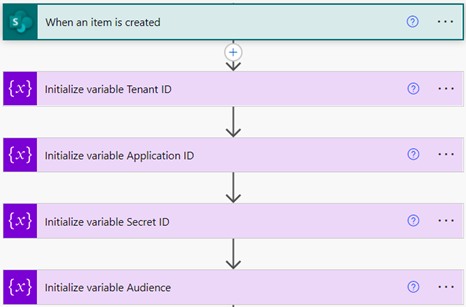
Initialize 4 string variables, we will use them in an HTTP action to authenticate against our app in Graph. Paste the copied values from your client secret, tenant ID and client (application) ID in the variables.
The audience variable is https://graph.microsoft.com.
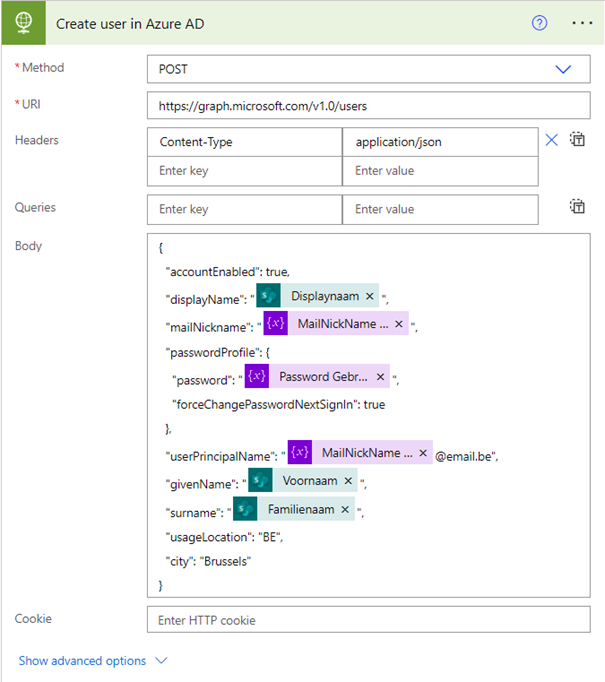
Add a new HTTP action and rename the action to “Create user in Azure AD”.
Fill in the URI and Headers as shown below in the screenshot. In the Body you need to fill in the (required) properties for the user. You can find all the properties that you can use in this documentation.
Important: the “usageLocation” property is required if you want to assign licenses later in the process. If you leave this empty, you will get an error when you assign licenses!
As you can see in the screenshot, I use information from a SharePoint list to populate the properties like Displayname, Surname,…
Remark: the mailnickname is just the Displayname of the user without any spaces. You can use the “Replace” function in Power Automate to remove the spaces with for example a period.
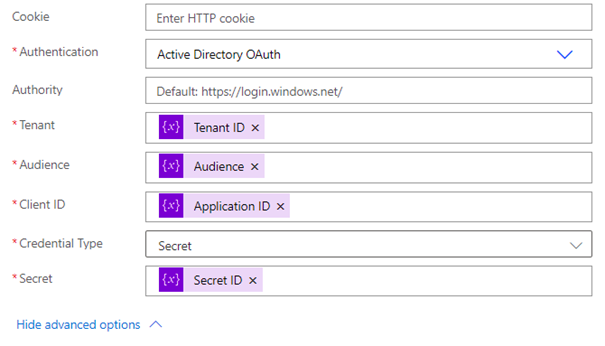
Now we need to authenticate against the app. Click on “Show advanced options” and select “Active Directory OAuth” in the Authentication box. Enter the Tenant, Audience, Client ID and Secret values with the variables created before.
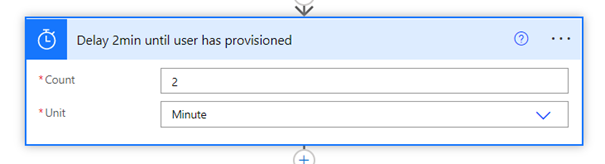
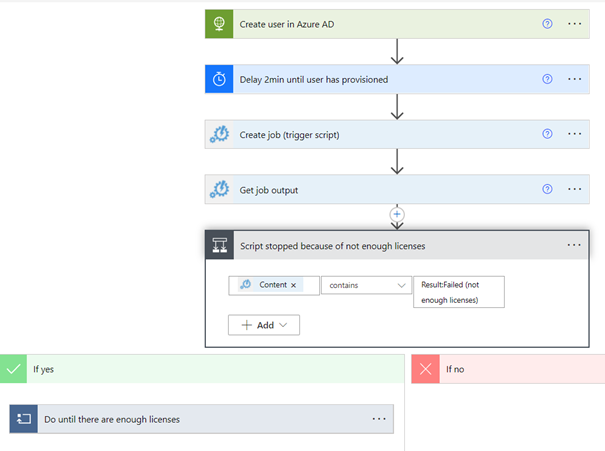
Add a delay of 2 min to provision the user in Azure AD.
Now save your flow. Next step is to assign the licenses to the user.
Assign licenses to the user with PowerShell and Azure Automation
Remark: you can also assign licenses by using dynamic membership AD groups, but this needs an Azure AD P1 license for each user that is part of an dynamic AD group.
Azure Automation
Prerequisites: you need an active Azure Subscription and an Azure Automation Account. How to create one, can be found here.
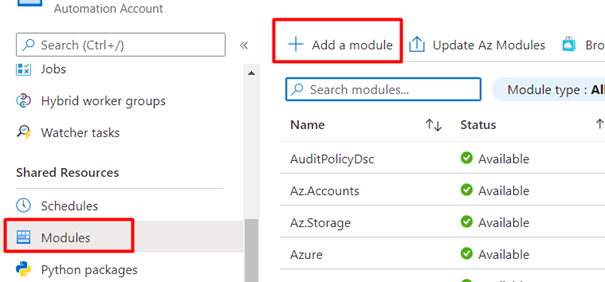
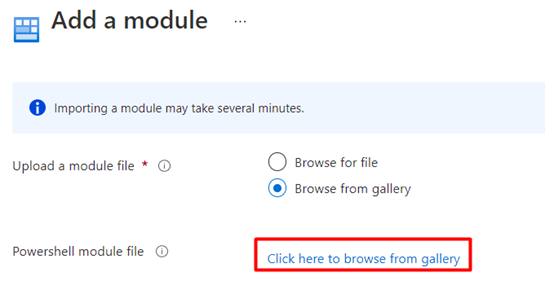
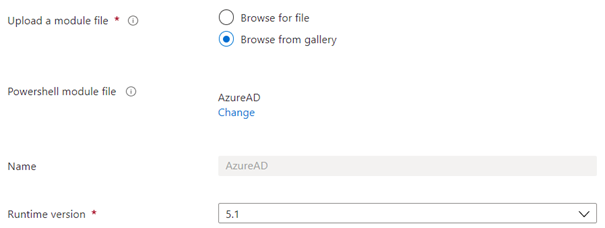
In your Automation Account, you need to import the module “AzureAD” to connect to it in the PowerShell script.
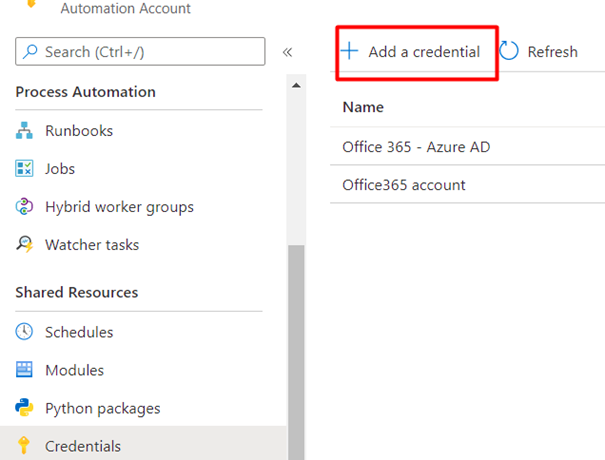
Add a new credential to authenticate to Azure AD in your Automation Account. This account needs sufficient permissions to be able to assign licenses to the user!
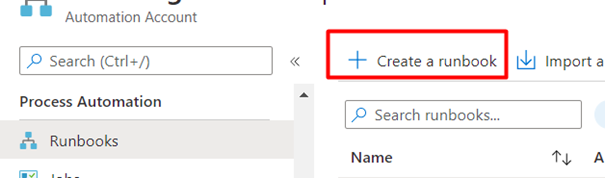
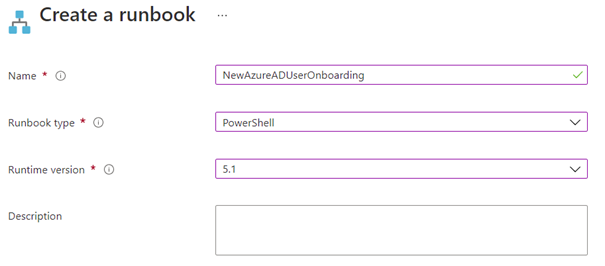
We will now create a new Runbook where the PowerShell script will be saved and triggered by the Power Automate flow.
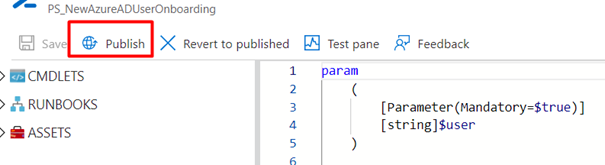
Now add the script below in your Runbook. We want to assign the licenses MICROSOFT 365 BUSINESS BASIC (O365_BUSINESS_ESSENTIALS) and Microsoft Defender for Office 365 (ATP_ENTERPRISE) to the user. You can find here all the licenses and their corresponding internal name.

param
    (
        [Parameter(Mandatory=$true)]
        [string]$user
        #The parameter $user will be retrieved from the Power Automate flow
    )

#Get Office 365 credential from Azure Automation and connect to Azure AD
$cred = Get-AutomationPSCredential -Name 'Office 365 - Azure AD'
Connect-AzureAD -Credential $cred

#Check if the licenses needed are available, if not, stop the script.
$neededlicenses = @("O365_BUSINESS_ESSENTIALS","ATP_ENTERPRISE")
foreach ($neededlicense in $neededlicenses)
{
    $availablelicenses = Get-AzureADSubscribedSku | Select SkuPartNumber,ConsumedUnits -ExpandProperty Prepaidunits| Where {$_.SkuPartNumber -eq $neededlicense}
    $countavailablelicenses = $availablelicenses.Enabled - $availablelicenses.ConsumedUnits
    write "${countavailablelicenses}: $neededlicense"
    if ($countavailablelicenses -lt 1)
    {
        Write "Result:Failed (not enough licenses)"
        Write "Description: LicensesNeeded for $neededlicense"
        $_.Exception.Message
        $_.InvocationInfo.ScriptLineNumber
        exit
    }

# Get the assigned licenses of a template user. This can be useful if you want to assign for example the license MICROSOFT 365 BUSINESS BASIC but without a license to Power Apps, Stream,…
    $TemplateUser = "templateuser@email.be"
    $AssignedLicenses = Get-AzureADUser -ObjectId $TemplateUser | Select -ExpandProperty AssignedLicenses

    foreach ($AssignedLicense in $AssignedLicenses)
    {
        # Get all the assigned plans from the template user
        $DesiredServicePlan = Get-AzureADUser -ObjectId $TemplateUser | Select -ExpandProperty AssignedPlans
        # Get all the plans from the Assigned License
        $StandardLicense = Get-AzureADSubscribedSku | Where {$_.SkuId -eq $AssignedLicense.SkuId}
        $StandardLicense
        $DesiredLicense = $StandardLicense.ServicePlans | ForEach-Object { $_ | Where {$_.ServicePlanId -NotIn $DesiredServicePlan.ServicePlanId}}

        # Compose the new license without the disabled plans
        $License = New-Object -TypeName Microsoft.Open.AzureAD.Model.AssignedLicense
        $License.SkuId = $StandardLicense.SkuId
        $License.DisabledPlans = $DesiredLicense.ServicePlanId
        $LicensesToAssign = New-Object -TypeName Microsoft.Open.AzureAD.Model.AssignedLicenses
        $LicensesToAssign.AddLicenses = $License

        # Assign the license to the new user
        Set-AzureADUserLicense -ObjectId $user -AssignedLicenses $LicensesToAssign
}
Publish the runbook:
Power Automate flow
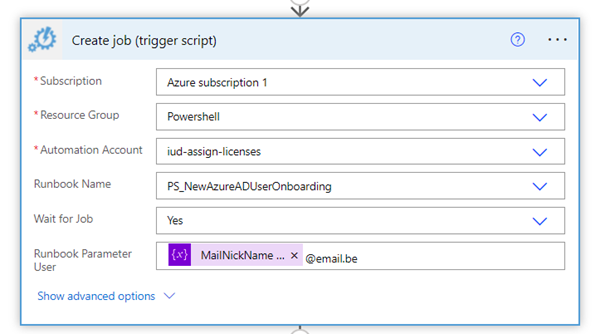
Return to your Power Automate flow and add a new action: “Create job” from Azure Automation.
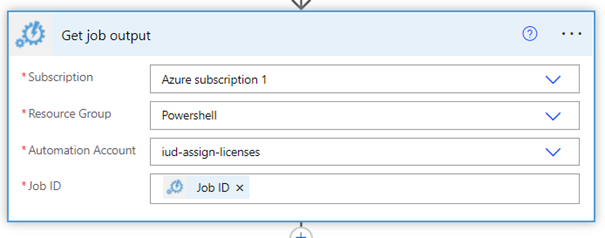
Add another action which gets the output from the script in your runbook:
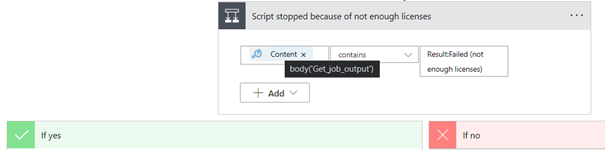
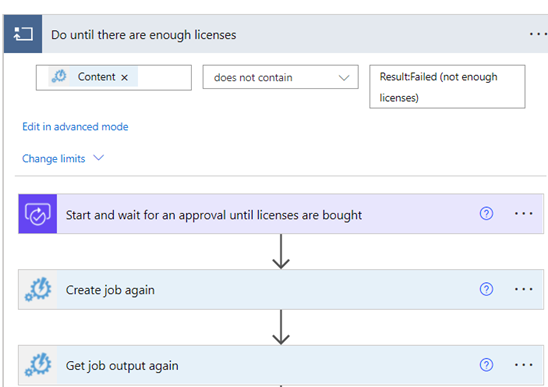
Add a new condition which checks if there are enough licenses. Add in the Yes branch a “Do until” action. This action will send an approval email if there are not enough licenses to assign, until someone from IT has added sufficient licenses in the tenant to assign to the new user.
Don’t forget to change the Timeout limit in the Do Until to PT720H, otherwise this action will stop after 1 hour!

Once someone from IT has bought the required amount of licenses and clicks on Approve, we will start the PowerShell script again to assign the licenses to the user.
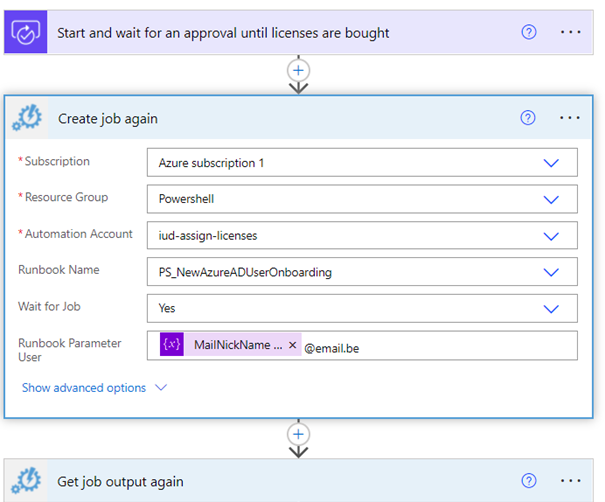
Remark: let’s say IT has clicked on Approve but they didn’t bought the required license. The script will fail again and will send a new approval mail to IT. That’s why we have added a Do Until in the workflow. The Do Until action will only stop until the assigning of the licenses is successful.
Overview of the Power Automate flow
Need more info? or looking for our experts to assist you? contact us!

It doesn’t work, I get the error Empty Payload. JSON content expected.